ASP.NET Core3.1 とMariaDBでWebアプリケーションを作成する。(データベースファースト)
Webアプリケーション をASP.NET Core3.1のデータベースファーストで作成します。
データベースは、MariaDBを使用します。
前提
- Windows10
- MariaDB 10.4
- VisualStudio 2019 Version 4.8.03752
以下の記事を参考にして、Webアプリケーションのプロジェクトを作成します。
wanouri.hatenablog.com
以下の記事を参考にして、MariaDB環境を構築しテーブルを作成します。
wanouri.hatenablog.com
テーブルは、以下の様なテーブルを準備しました。
CREATE TABLE `items` (
	`code` INT(11) NOT NULL DEFAULT 0 COMMENT '商品コード',
	`name` VARCHAR(50) NULL DEFAULT NULL COMMENT '商品名',
	PRIMARY KEY (`code`)
)
ENGINE=InnoDB
;
プロジェクトファイルを編集する
- ソリューションエクスプローラーよりプロジェクトファイルを右クリックして、「プロジェクトファイルの編集」を選択します。
- ItemGroupタグに、下記を追加してソリューションのビルドを行います。
  <ItemGroup>
    <PackageReference Include="Microsoft.EntityFrameworkCore.Tools" Version="3.1.1">
      <IncludeAssets>runtime; build; native; contentfiles; analyzers; buildtransitive</IncludeAssets>
      <PrivateAssets>all</PrivateAssets>
    </PackageReference>
    <PackageReference Include="Pomelo.EntityFrameworkCore.MySql" Version="3.1.1" />
    <PackageReference Include="Pomelo.EntityFrameworkCore.MySql.Design" Version="1.1.2" />
    <PackageReference Include="Microsoft.VisualStudio.Web.CodeGeneration.Design" Version="3.1.1" />
  </ItemGroup>
Models生成
- ツールよりコマンドラインを選択して、「開発者用PowerShell」を選択します。
- EF Core ツールをインストールします。
dotnet tool install --global dotnet-ef
- 次に以下のコマンドを実行します。
dotnet ef dbcontext scaffold server="localhost;port=3306;database=(sampledb);uid=(user);password=(password);" "Pomelo.EntityFrameworkCore.MySql" --output-dir Models
- PowerShell にBuild succeeded. と表示されたら、Modelsフォルダに (テーブル名).cs ファイルが作成されています。
appsettings.jsonを編集
下記を追加
"ConnectionStrings": {
    "RazorPagesMovieContext": "server=localhost;port=3306;database=(sampledb);uid=(user);password=(password)"
  }
Startup.csを編集
変更前:
public void ConfigureServices(IServiceCollection services)
{
    services.AddControllersWithViews();
}
変更後:
static readonly string _RequireAuthenticatedUserPolicy =
                            "RequireAuthenticatedUserPolicy";

public void ConfigureServices(IServiceCollection services)
{
    services.AddDbContext<Models.sampledbContext>(options =>
        options.UseMySql(
            Configuration.GetConnectionString("RazorPagesMovieContext")));

    services.AddControllersWithViews();
    services.AddRazorPages();
    services.AddAuthorization(o => o.AddPolicy(_RequireAuthenticatedUserPolicy,
                            builder => builder.RequireAuthenticatedUser()));
}
スキャフォールディング
- ソリューションエクスプローラのControllersを右クリックして、新規スキャフォールディングアイテムをクリックします。
- 「Entity Frameworkを使用したビューがあるMVCコントローラ」を選択して追加ボタンをクリックします。

- 「モデルクラス」、「データコンテキストクラス」を選択して追加ボタンを押します。

デバッグ実行
- デバッグを開始して、URLの末尾にitemsと付加して更新します。(以下は例)
https://localhost:44335/items
- テーブルの内容が表示されます。

ASP.NET Core 3.1 でWebアプリケーション を作成する
ASP.NET Core 3.1 でWebアプリケーションを作成して、ブラウザで実行させます。
前提
- Windows 10
- VisualStudio 2019 Version 4.8.03752
- .NET Core 3.1
プロジェクトを作成する
- 新しいプロジェクトの作成をクリックします。

- ASP.NET Webアプリケーション(.NET Framework)を選択して「次へ」をクリックします。

- プロジェクト名と場所を入力して「作成」をクリックします。

- 「IIS Express」ボタンをクリックして実行します。

- ページが表示されます。

- 「Webサーバー 'IIS Express'に接続できませんでした。」と表示された場合

Twitter API Key を取得する
はじめに
前提
- Twitter アカウントを取得しておいてください。
Twitter Developers ページにアクセス

Create an app ボタンを押します。

「申請しますか」と尋ねられますので、Applyボタンを押します。

ここではテスト用途なので、Doing something else を選択しました。

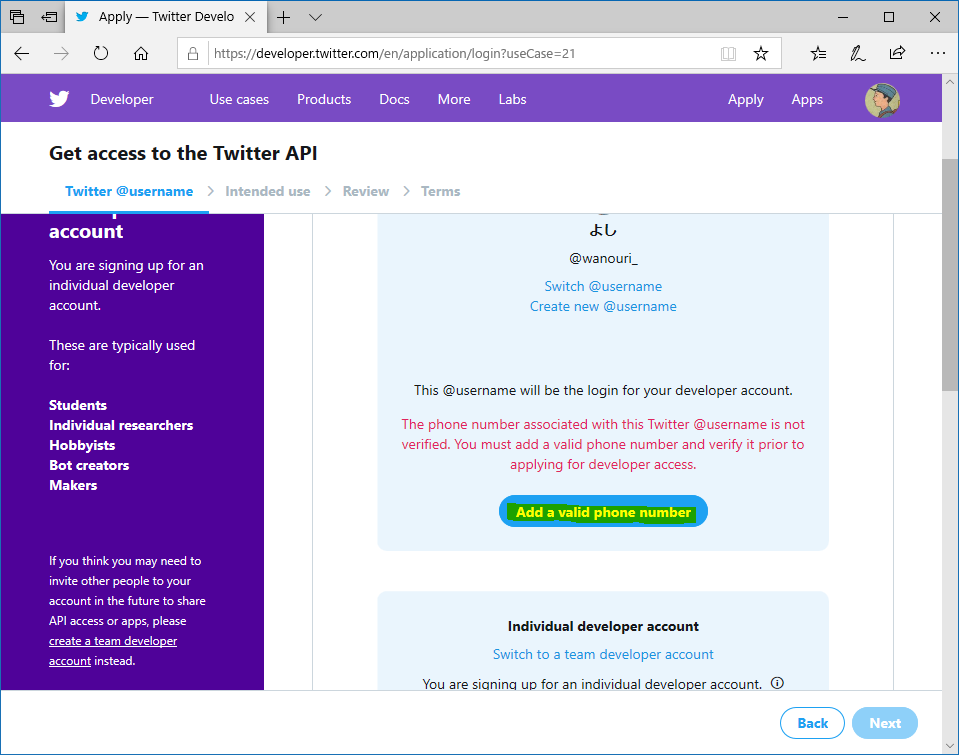
使用するには、有効な電話番号を登録する必要があるので、Add a valid phone number.ボタンを押します。

「電話番号を追加」をクリックします。

Twitter のパスワードを入力します。

電話番号を追加する必要がありますので、電話番号を追加します。

電話番号に認証コードが表示されますので、認証コードを入力します。

国とニックネームを入力しました。

Twitter API をどの様な用途で利用するか入力します。

「Twitter開発者プラットフォームへのアクセスが遅くなったり、アプリケーションが拒否されたりする可能性があります。」
ので、できるだけ詳細に解凍します。ここではテスト用なので全てオフに設定しました。

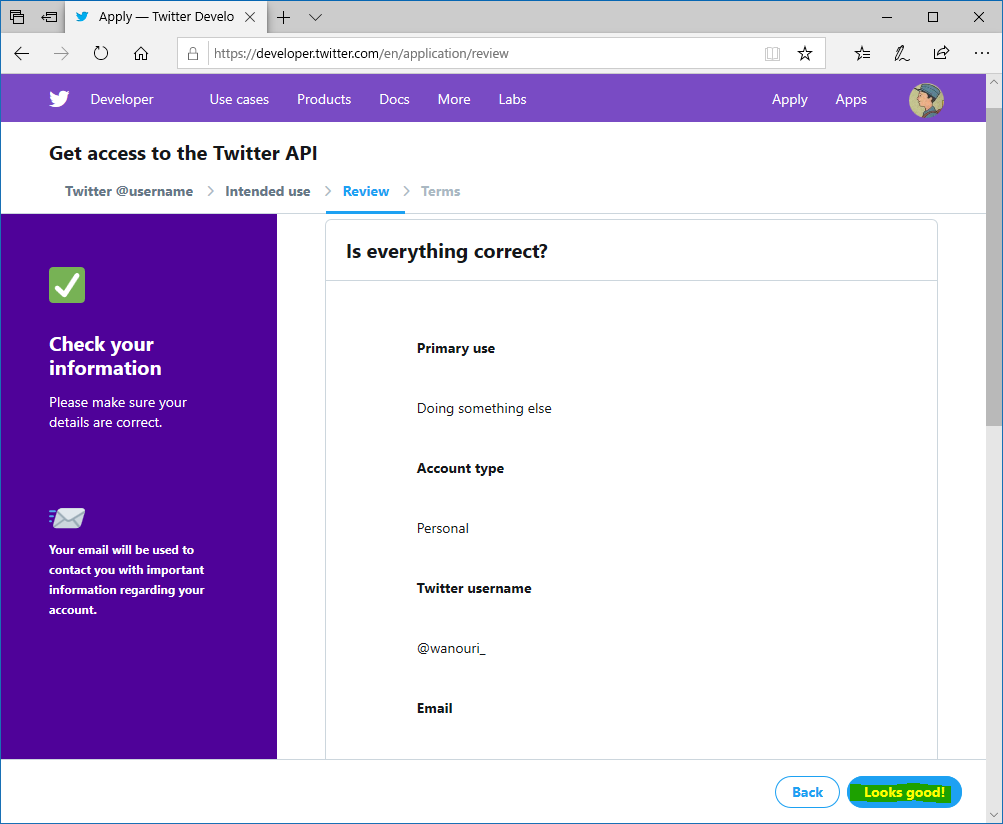
確認です。looks good ボタンを押します。

チェックして、Submit application ボタンを押します。

完了です。
Windows10にnode.jsをインストールする
はじめに
Windows10にnode.jsをインストールします。
前提
- Windows10 (x86-64)
- node.js 12.16.2 LTS
ダウンロード
- 以下のURLから12.16.2 LTS 推奨版をクリックします。

インストール
node-v12.16.2-x64.msi をダブルクリック

→ [NEXT]

「I accept the terms in the License Agreement」(チェックする。)
→ [NEXT]

→ [NEXT]

(変更があれば変更する。通常はデフォルトで良い)
→ [NEXT]

→ [Next]

→ [Next]

→ [Finish]
インストール確認
コマンドプロンプトを開きます。
[nodejsのバージョン]

[npmのバージョン]

expressをインストールする
Webアプリケーション フレームワーク express をインストールします。

express-generator をインストールします。

expressのバージョンを確認します。

Webアプリケーション を作成する
sampleappを作成します。(C直下)


Webアプリケーション のパッケージをインストールします。

Webアプリケーション を起動して確認
Webアプリケーション を起動。

ブラウザで確認します。(http://localhost:3000)

Windows10にMariaDB10.4をインストールする
はじめに
Windows10にMariaDBをインストールします。
MariaDBは、MySQL派生のRDBMSです。
前提
ダウンロード
- 以下のURLからDownload MariaDB Serverをクリックします。


インストール
mariadb-10.4.12-winx64.msi をダブルクリック

→ [NEXT]

「I accept the terms in the License Agreement」(チェックする。)
→ [NEXT]

(変更があれば変更する。通常はデフォルトで良い)
→ [NEXT]

rootのパスワードを入力する。
「Use UTF8 as default server's character set」(UTF8文字コードの場合、チェックする。)
→ [Next]

→ [Next]

→ [Next]

→ [Install]
「このアプリがデバイスに変更を加えることを許可しますか」
→「はい」
(しばらく待つ・・・)

→ [Finish]
データベースの作成と権限付与
スタートメニューより、MariaDB > MySQL Client(MariaDB 10.4(x64))を開く。

Enter password: (セットアップ時に入力したパスワード)
[データベース作成]

CREATE DATABASE SAMPLEDB CHARACTER SET UTF8;
(SAMPLEDBを作成)
[ユーザ作成と権限]
MariaDB [(none)]> CREATE USER USER@'%' IDENTIFIED BY '(パスワード)';
MariaDB [(none)]> USE SAMPLEDB
MariaDB [(SAMPLEDB)]> GRANT ALL PRIVILEGES ON SAMPLEDB.* TO USER@'%';
(ユーザ:USERを作成して、ALL PRIVILEGES 権限を付与)
Android Activityのライフサイクル確認
はじめに
Android Activityのライフサイクルを確認する目的で、挙動確認用のコードをKotlinで書いてみました。
ライフサイクル

挙動確認用のコード
<?xml version="1.0" encoding="utf-8"?>
<androidx.constraintlayout.widget.ConstraintLayout xmlns:android="http://schemas.android.com/apk/res/android"
    xmlns:app="http://schemas.android.com/apk/res-auto"
    xmlns:tools="http://schemas.android.com/tools"
    android:layout_width="match_parent"
    android:layout_height="match_parent"
    tools:context=".MainActivity">

    <TextView
        android:id="@+id/textView"
        android:layout_width="wrap_content"
        android:layout_height="wrap_content"
        android:inputType="textMultiLine"
        android:maxLines="40"
        android:minLines="40"
        android:scrollbars="horizontal"
        android:singleLine="false"
        android:text="TextView"
        android:textSize="24sp"
        android:textStyle="bold"
        tools:layout_editor_absoluteX="16dp"
        tools:layout_editor_absoluteY="16dp" />
</androidx.constraintlayout.widget.ConstraintLayout>
activity_main.xml
package com.example.activitysample

import androidx.appcompat.app.AppCompatActivity
import android.os.Bundle
import android.util.Log
import android.widget.TextView
import java.time.LocalDateTime
import java.time.format.DateTimeFormatter

class MainActivity : AppCompatActivity() {

    override fun onCreate(savedInstanceState: Bundle?) {
        super.onCreate(savedInstanceState)
        setContentView(R.layout.activity_main)

        addText("onCreate")
    }

    override fun onStart() {
        super.onStart()
        addText("onStart")
    }

    override fun onRestart() {
        super.onRestart()

        addText("onRestart")
    }

    override fun onResume() {
        super.onResume()
        addText("onResume")
    }

    override fun onPause() {
        super.onPause()
        addText("onPause")
    }

    override fun onStop() {
        super.onStop()
        addText("onStop")
    }

    override fun onDestroy() {
        super.onDestroy()
        val dt = LocalDateTime.now().format(DateTimeFormatter.ofPattern("yyyy-MM-dd HH:mm:ss.SSS"))
        Log.d(MainActivity::class.java.simpleName,dt.plus(" ").plus("onDestroy"))
    }

    fun addText(s : String) {

        val dt = LocalDateTime.now().format(DateTimeFormatter.ofPattern("yyyy-MM-dd HH:mm:ss.SSS"))

        val textView : TextView = findViewById(R.id.textView)

        if (textView.text.isNotEmpty()) {
            textView.text = textView.text.toString().plus("\n").plus(dt).plus(" ").plus(s)
        }
        else
        {
            textView.text = dt.plus(" ").plus(s)
        }
    }

}
MainActivity.kt
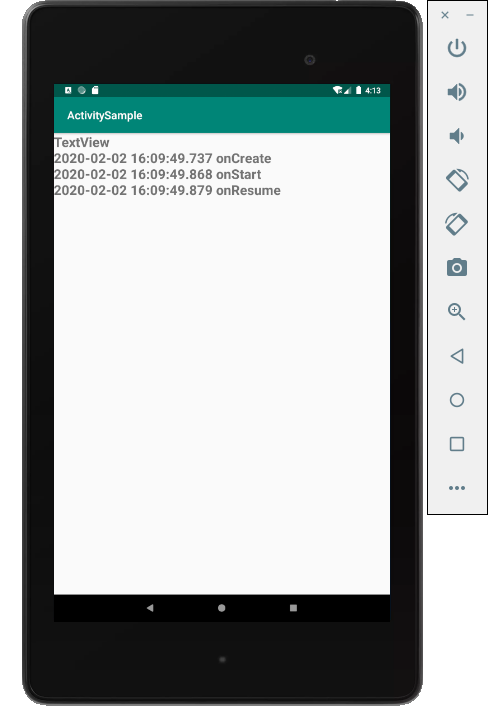
挙動は、TextViewに時刻と一緒に追記する形で実装しました。OnDestroy()メソッドは、TextView表示ではなくLog出力させています。
デバッガで実行してみる


- メニューボタンを押して、別のアプリ起動
- onPause
- onStop
- 別のアプリから戻ってくる
- onRestart
- onStart
- onResume
バックボタンを押すと
- onPause
- onStop
- onDestroy
画面を回転させると、onCreateから実行されます。
それぞれなにを実装する?
onCreate
画面レイアウトの生成やクラスの生成など、アプリ起動後はじめに行う処理を実装します。
onStart
画面コントロールの初期化、クラスの初期化を実装します。
onResume
データベースへの接続やネットワーク接続を行い、
アプリ画面にデータを表示させる処理を実装します。
onPause
画面がバックグラウンドに回るときに呼び出されます。
この場合、アプリは強制終了させられてしまう可能性がありますので、データ保存処理などはここで行います。
データベース、ネットワークなどのdisconnectもここで行います。
onStop
onStartで初期化したクラスのDestroyメソッドをコールする処理を実装します。(クラスの中身をnull)
onDestroy
onCreateで生成したコントロールやクラスの参照変数の破棄を実装します。
Parallels Desktop の上で動いているWindows10が重たくなったので試してみたこと
はじめに
MacBook Air にParallels Desktopを導入していますが、以下のどれかのタイミングで重くなったように感じられました。
- MacOS Catalina にアップグレードした。
- Parallels Desktop 14から15 にアップグレードした。
環境
- macOS Catalina バージョン 10.15.2
- MacBook Air (2017) メモリ8GB
症状
- Windowsの描画が遅すぎて作業にならない。
- VisualStudio 2017など立ち上げると、タイトルが1分以上表示されている。
- タスクマネージャのパフォーマンスでCPU100% がつづく
実施して効果がなかったもの
- Parallels Desktop に割り当てるメモリをふやしてみた。
- Parallels Desktop のWindowsとの共有をはずす。
- Windowsで不要なアプリをアンインストールする。
- Windowsで「システムのプロパティ」から「詳細設定」、「パフォーマンス」で「パフォーマンスを優先する」にチェックする。
実施して効果があったもの
- MacのSMCをリセットする。
Mac の SMC をリセットする方法 - Apple サポート
作業は、以下のように行いました。
- Mac をシステム終了します。
- キーボードの「shift + control + option」キーと電源のボタンを同時に10 秒間押し続けます
- すべてのキーから指を放します。
- 電源のボタンを押して、Macを起動します。
私の環境ではパフォーマンスにストレスを感じることなく作業できるようになりました。